Challenges 2026 Jamboree#
Challenge 1: Robot Shuffle#
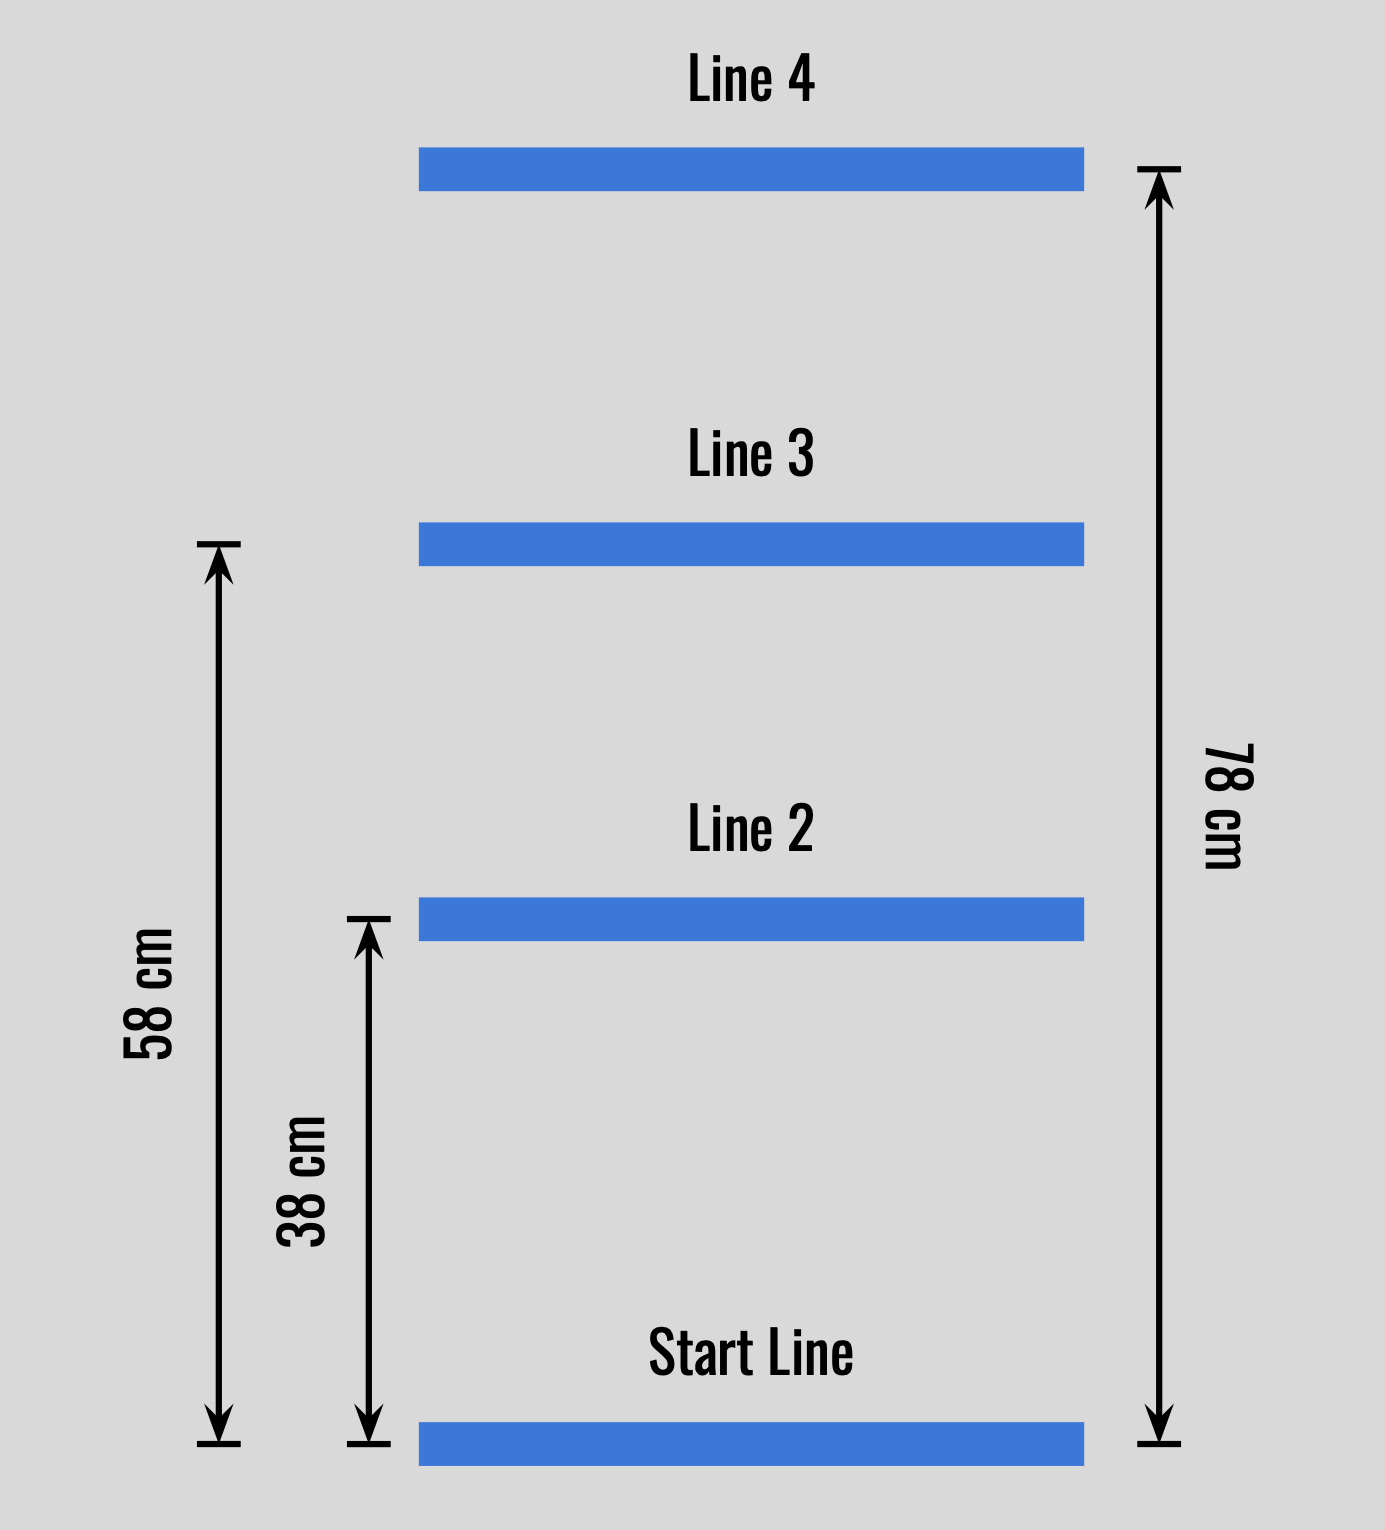
This challenge tests the programming skills required to move the Driving Base forward and backward. To complete the challenge, the Driving Base must move around the course in the following manner:
Move from the Start Line to Line 4, 78 cm from the Start Line, at 50% speed.
Wait 2 seconds.
Move to Line 2, 38 cm from the Start Line, at 25% speed.
Move forward 20 cm to Line 3 at 75% speed.
Wait 2 seconds.
Move forward at 50% speed and stop on line 4.
Wait 2 seconds.
Move backwards at 75% speed and stop on the Start Line.
Display a smiley face.
Note
The Driving Base should execute all steps, moving only forward and backward, and stop on the Start Line. Specifically, the Driving Base tires will start on the Start Line and should also stop on the Start Line. In addition, the driving base should stop on Lines 2-4 when completing this challenge. Finally, not all line locations are given. The steps above should be read carefully to interpret where each line is located on the course.
Field diagram challenge 1#
Challenge 2: ‘Round the Garage#
This challenge will require students to program their Driving Base to move around a garage (kit box), testing their ability to program the Driving Base to turn precisely. To complete this challenge, the Driving Base must move around the course in the following manner:
A kit box will be placed in the center of a 4’ by 4’ table with raised sides.
The kit box will be positioned such that the short sides of the box are closer to the top and bottom of the table, and the long sides of the box are closer to the left and right sides.
A 12” by 12” square will be taped in the bottom left corner of the table and serve as the starting point for the Driving Base.
The Driving Base will start facing the top of the table.
The Driving Base must be programmed to turn around the kit box in a counter clockwise direction, and finish inside the 12” by 12” square, again facing the top of the table.
The Driving Base must demonstrate at least two different types of turns as it moves around the kit box. It must also move backward along the side of the kit box at least once.
Once the Driving Base is in the 12” by 12” square, the Hub should be programmed to display a winking face, signifying the completion of the challenge.
Note
Both tires should finish inside the taped square. In addition, the Driving Base is not allowed to touch the kit box or the sides of the table as it moves. Use the challenge figure for help with the setup of this course.
Field diagram challenge 2#

Challenge 3: Capture the Hay Bales#
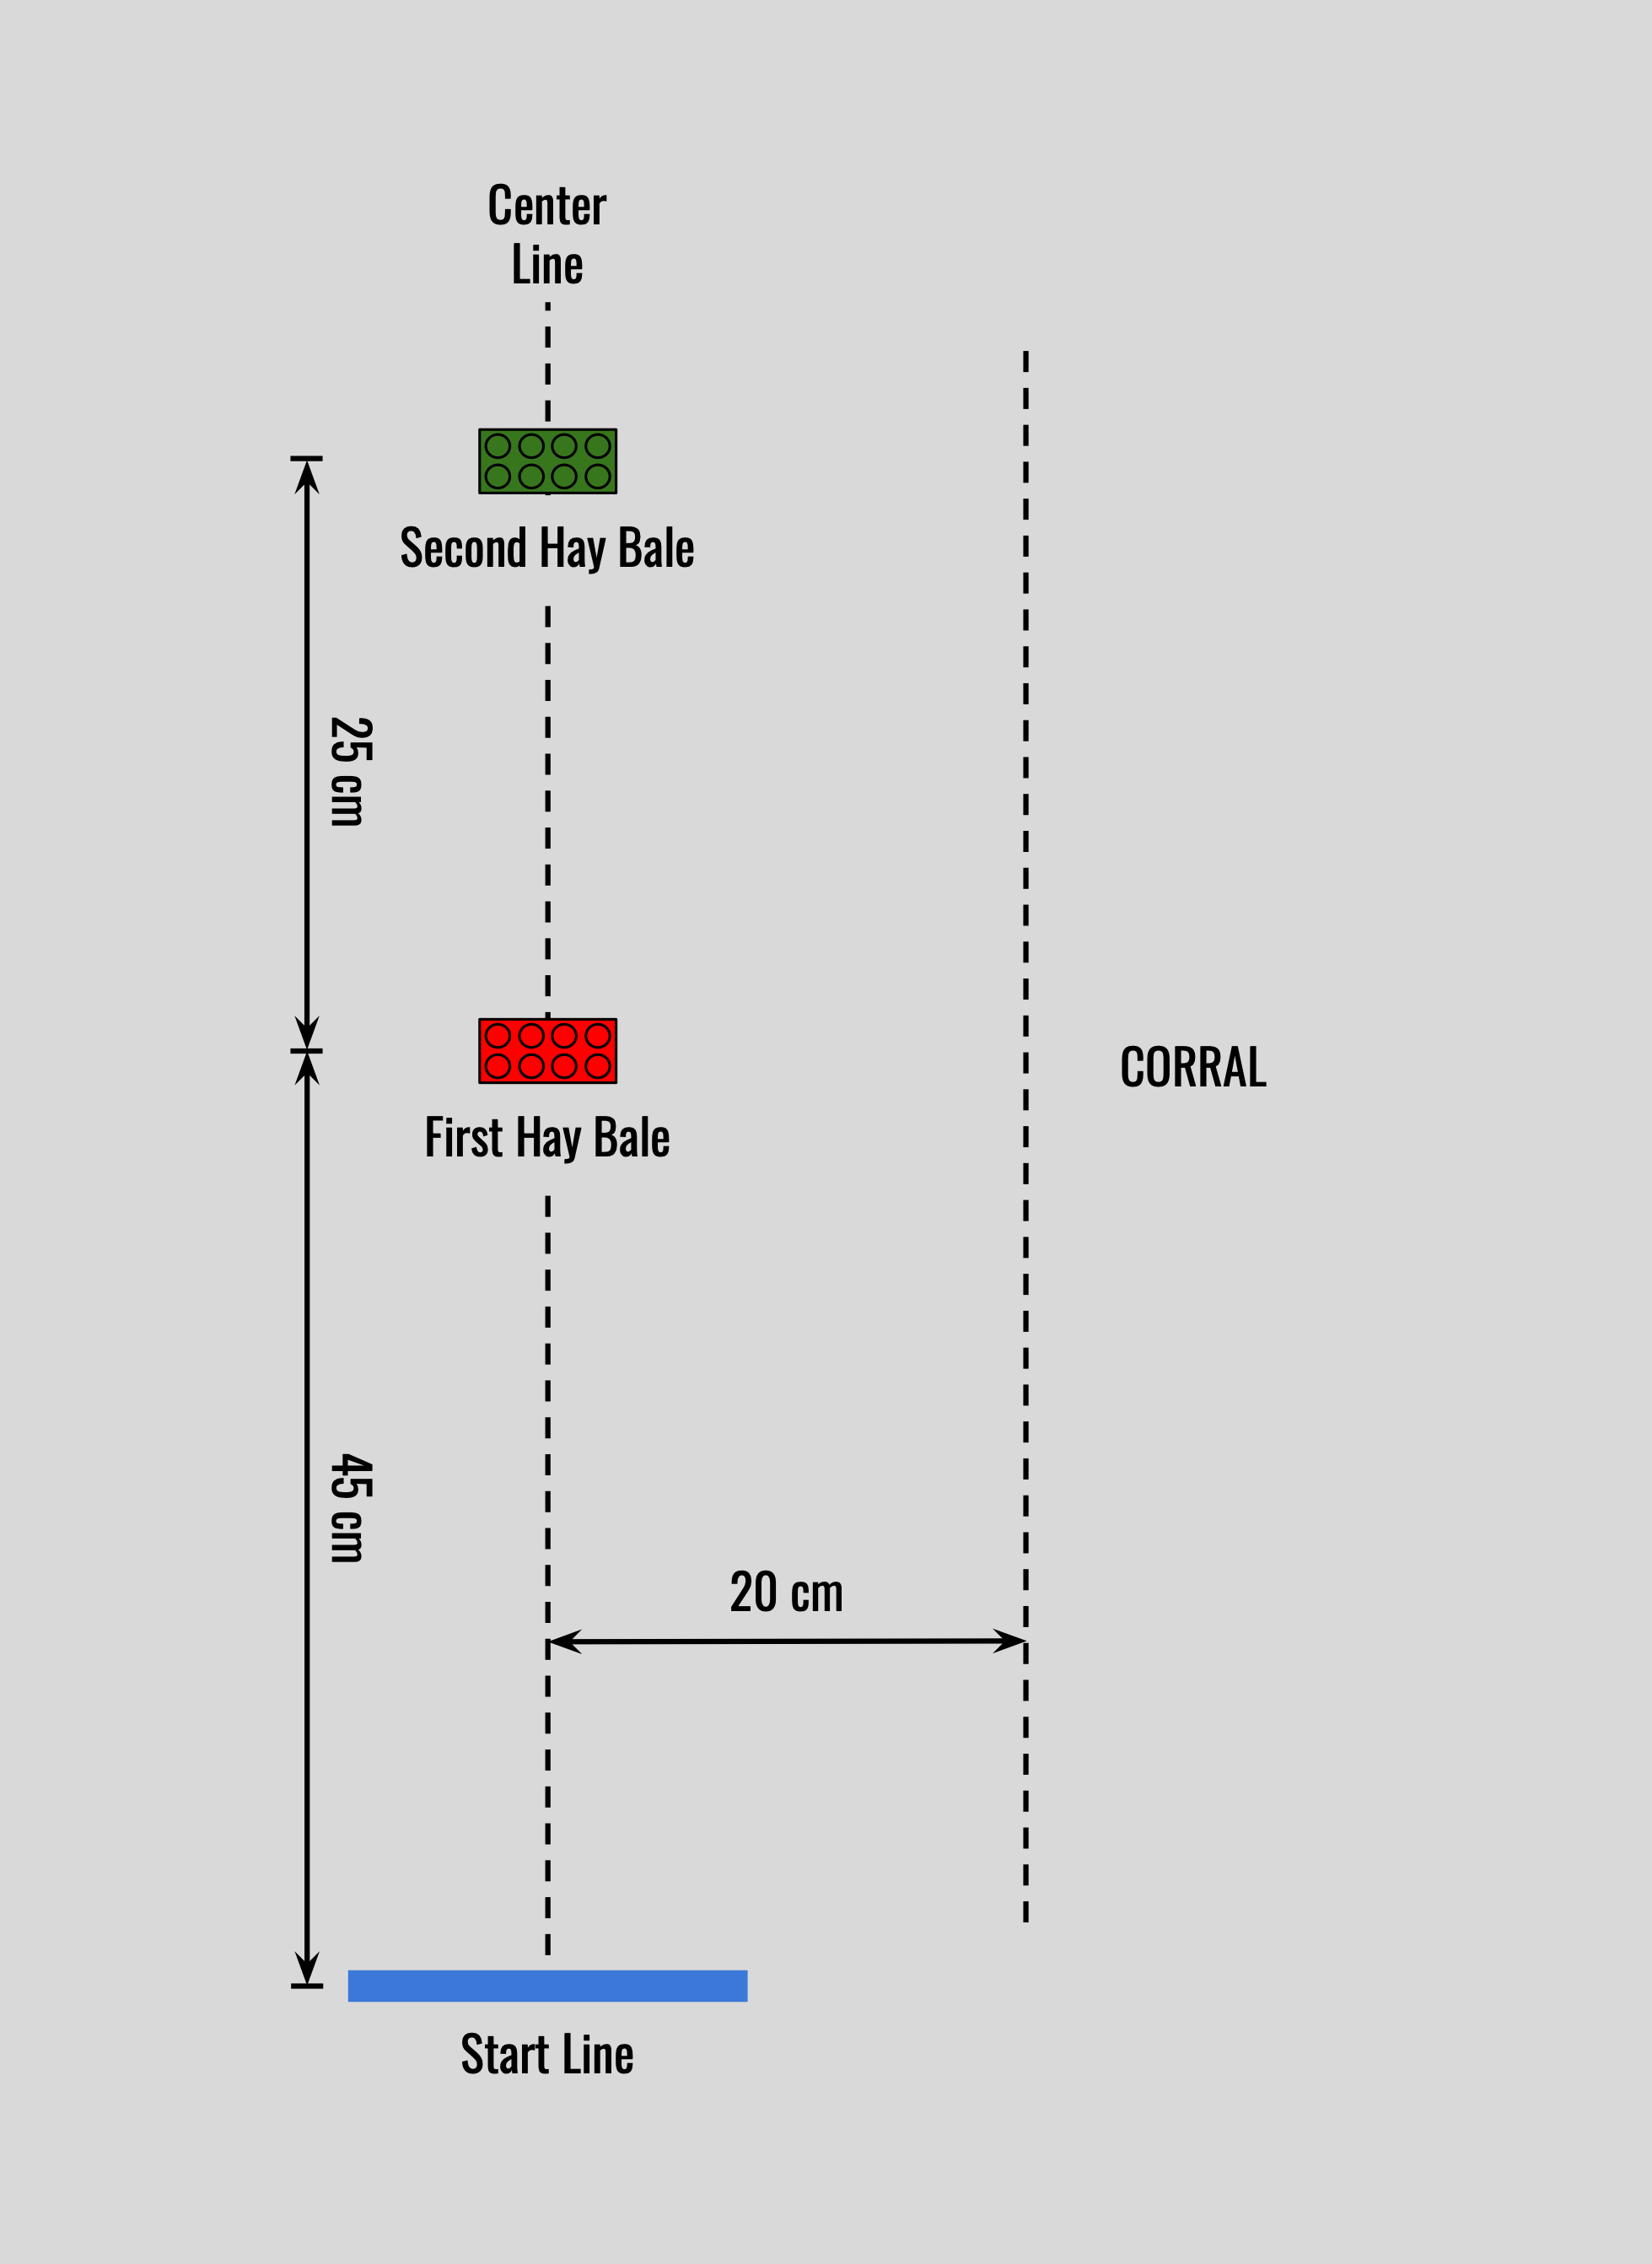
This challenge uses a third motor to control an arm to test the accuracy and skill of the student’s programming. The hay bales are two LEGO bricks stacked on each other from the kit. It is imperative that the students correctly line up the Driving Base with the hay bales so that the Driving Base can capture and move both hay bales without student intervention. To complete this challenge, the Driving Base must move around the course in the following manner:
The Driving Base is positioned so its tires are on the start line.
The Driving Base moves forward and captures the first hay bale 45 cm away from the start line.
The Driving Base waits 2 seconds.
The Driving Base turns right and moves (and leaves) the first hay bale into the corral 20 cm from the center line.
The Driving Base waits 2 seconds.
The Driving Base returns to the center line.
The Driving Base moves forward and captures the second hay bale 25 cm away from the first hay bale.
The Driving Base waits 2 seconds.
The Driving Base moves backward and places the second hay bale on the start line.
The arm moves up, and the Hub displays a smiley face.
Note
Precision and accuracy are vital in this challenge. Because speed will be a factor, the suggested motor speeds are 25%. Students may modify their Driving Base arm to better capture the hay bales.
Field diagram challenge 3#
Challenge 4: Sensor Four Square#
This challenge is a technical trial to ensure students understand how to use the functions of the Driving Base sensors. This challenge also utilizes a simple “loop command” to make the robot move back and forth until a judge intervenes. To complete this challenge, the Driving Base must move around the course in the following manner:
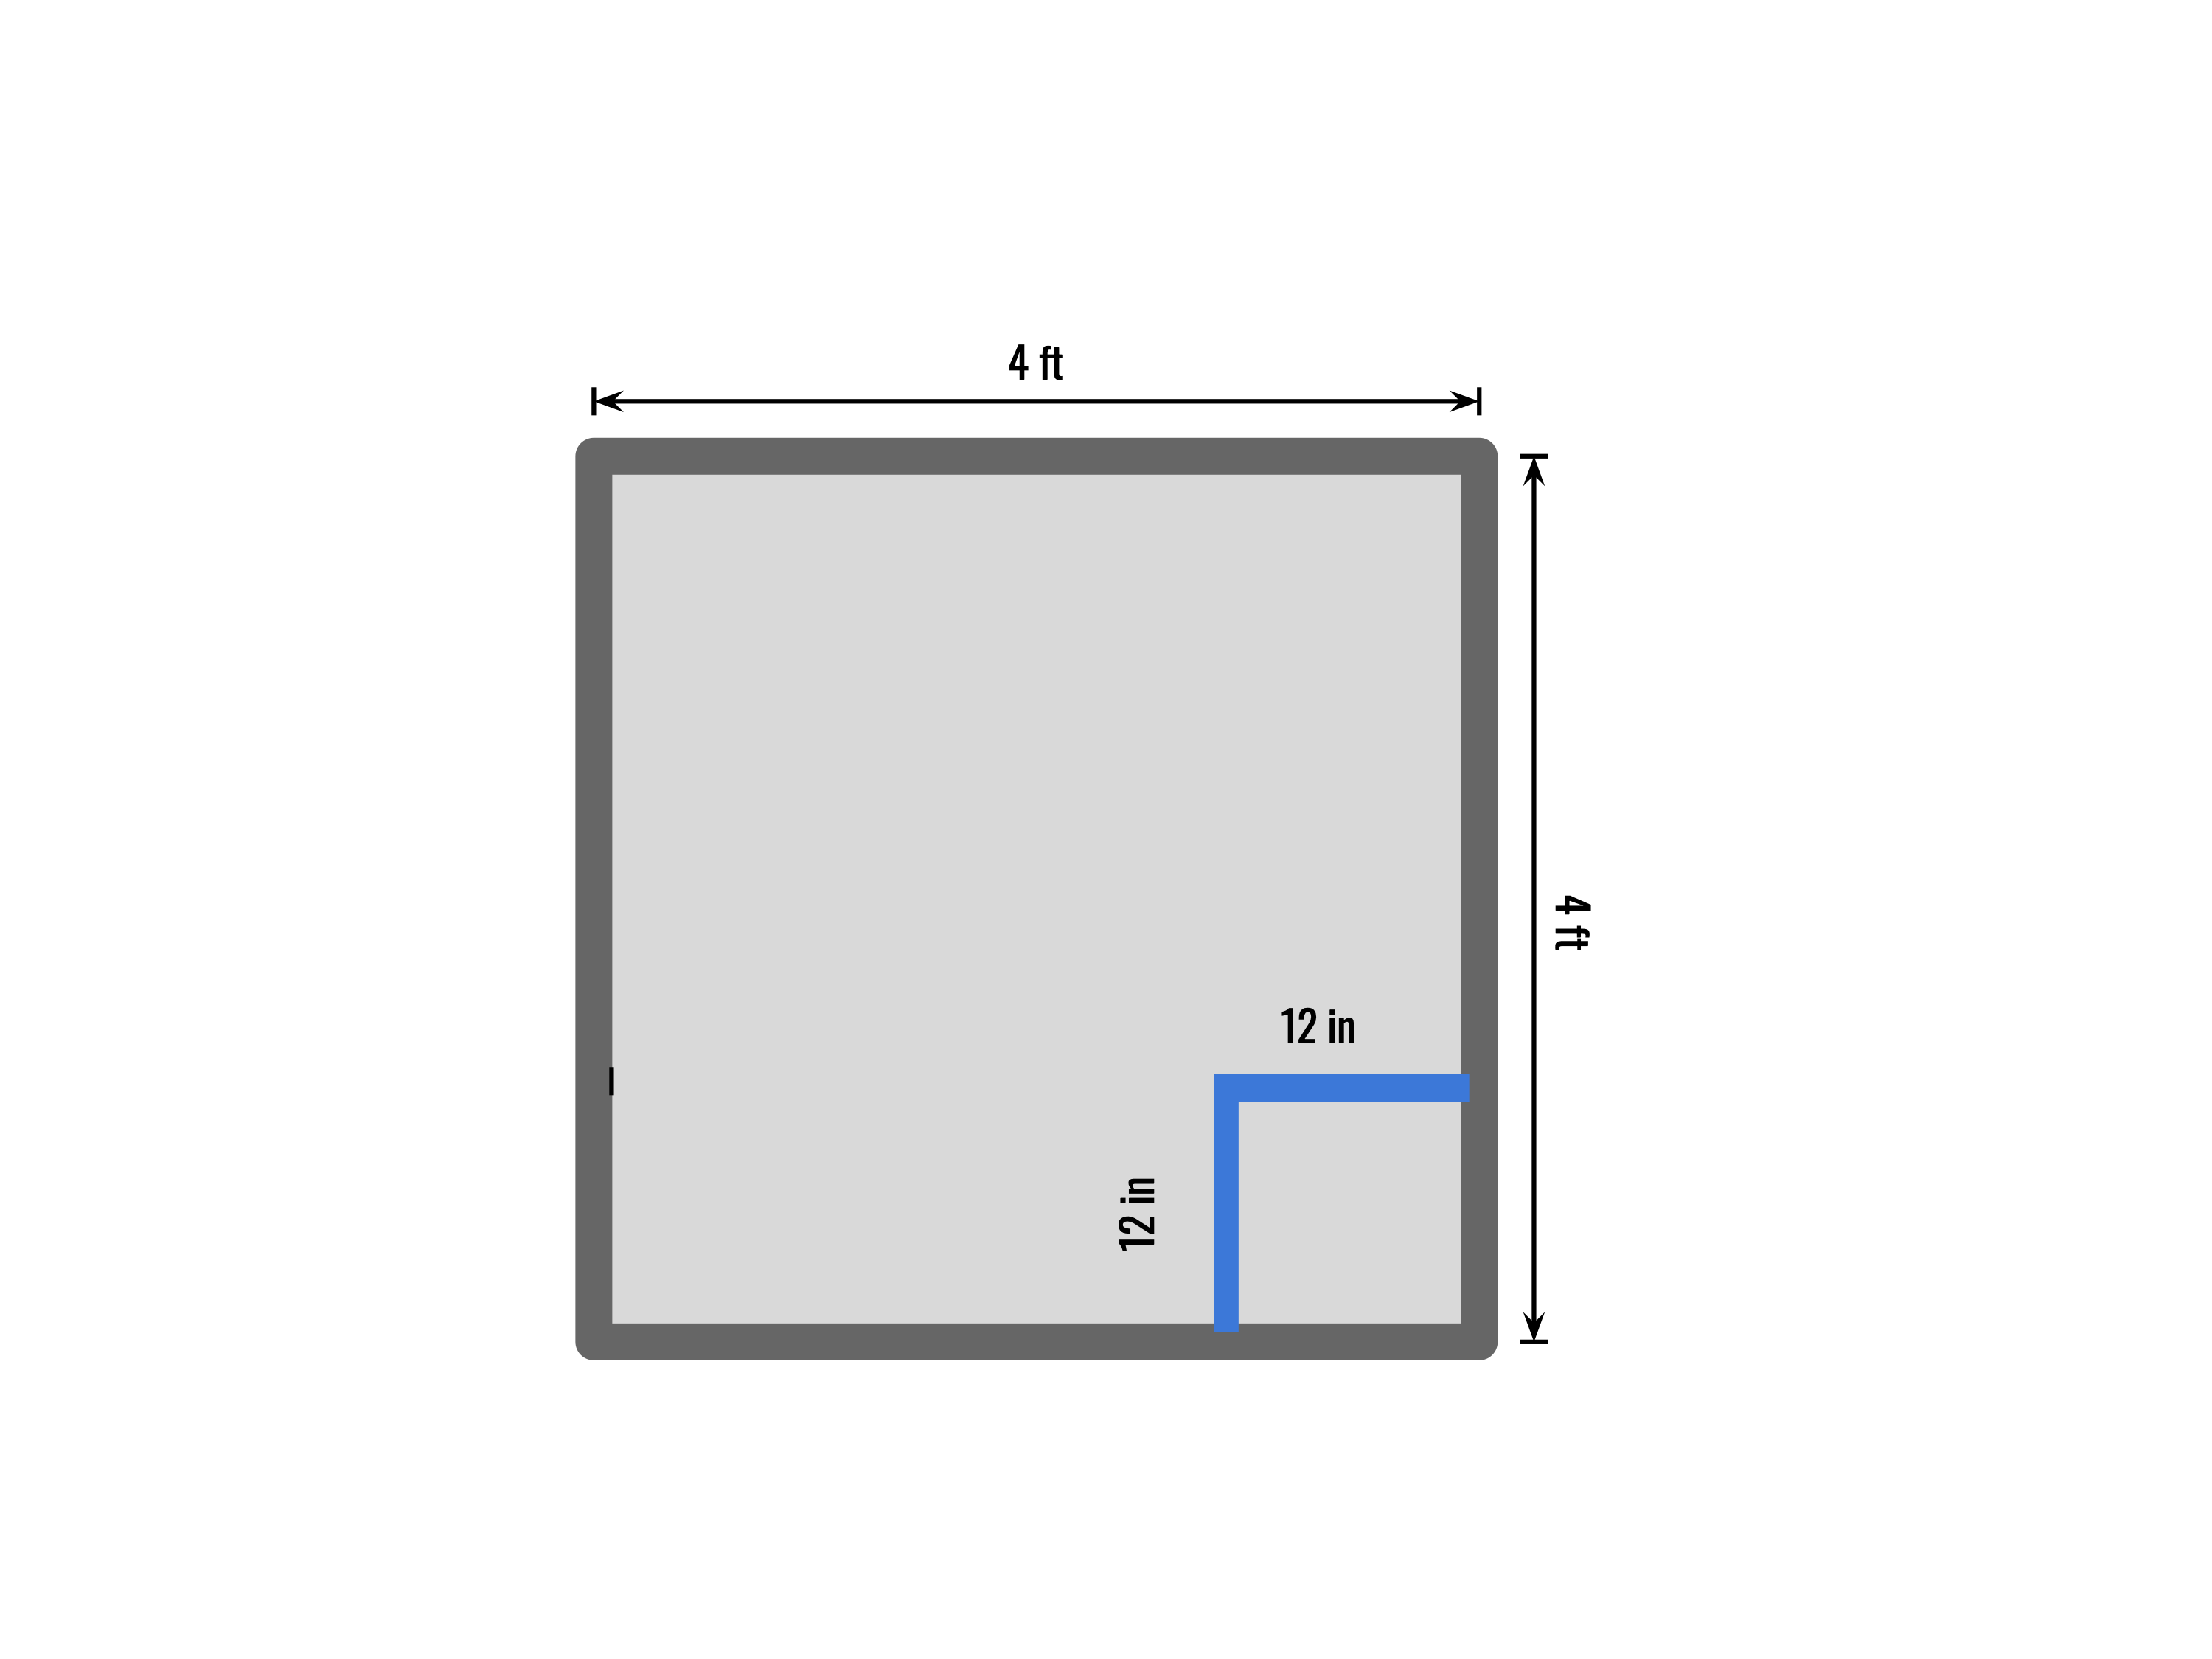
The Driving Base tires are placed in the center of a 12” by 12” taped square at the bottom right corner of a 4’ by 4’ table surrounded by walls.
The Driving Base moves forward toward the top wall of the table. When the force sensor is pressed, the Driving Base moves backward 6”, then waits for 2 seconds.
The Driving Base then turns left 90 degrees and moves forward until it is 10” from the left wall of the table.
The Driving Base turns 90 degrees to the left, moves forward toward the bottom wall of the table, and moves backward 4” when the force sensor is pressed.
The Hub displays a frowny face, and the Driving Base waits for 2 seconds.
The Driving Base turns 90 degrees to the left and moves forward 10 in, then backwards 10 in, then repeats this movement (back and forth) until the judge waves his hand in front of the robot (6” or less) and the robot stops.
The student then depresses the force sensor, and after a four second delay, the robot moves forward toward the right wall of the table.
Using the color sensor, when the Driving Base enters the 12” by 12” taped square, it turns 90 degrees to the left to face the top wall. The Driving Base must finish inside the taped square without touching the tape.
Note
It is suggested that students attach LEGO rods to the force sensor so that the Driving Base does not collide with the wall as the force sensor detects the wall.
Field diagram challenge 4#
Challenge 5: You Design It!#
This is a three-part challenge. “Execution”, “Creativity”, and “Practical Application”.
Your team will design their own challenge for their robot. They will score points (5 in each area) as follows:
Execution - the robot does what you say it will do, and if it does, you get 5 points!
Creativity - the robot utilizes many behavioral aspects that you learned (i.e. # of turns, # of sensors used, etc.). Don’t make it too complicated, but try and show that you grasp several of the behaviors and sensors that were in challenges 1 thru 4. We’ll be lenient here… but show that your students understand the basic behaviors…. two types of turns, different speeds, a couple of sensors used during the run… you get the idea?
Practical application - Have your students describe what the robot is doing, as if it were being used in a real application (i.e. herding cattle and moving them into a pasture, chasing around their favorite teacher until they lock him/her in a restroom, picking up recyclable material and putting it in a recycle area, a zoo tram, etc.) … you get the idea?
What we expect is that the team will bring with them a brief paragraph that describes the practical application, the behaviors, moves, and sensors that are being utilized, and then demonstrate their robot on the playing field. You can bring your own playing field, tape if you want, so long as it can be easily removed and leaves no mark. Your playing field must fit inside our 4 ft x 8 ft playing field table (the ones we typically use at the jamboree. You can also bring any other props you want to use. Just as long as it’s appropriate for what we are doing, and that they can easily be set up and put away after they’re done so we don’t create a huge logjam. We will provide the 4 ft. x 8 ft. table for you to demonstrate on, or you can put it on the floor.
Now, please have fun and stun the judges with your creativity!! Good Luck!
Challenge 6: Line Follower#
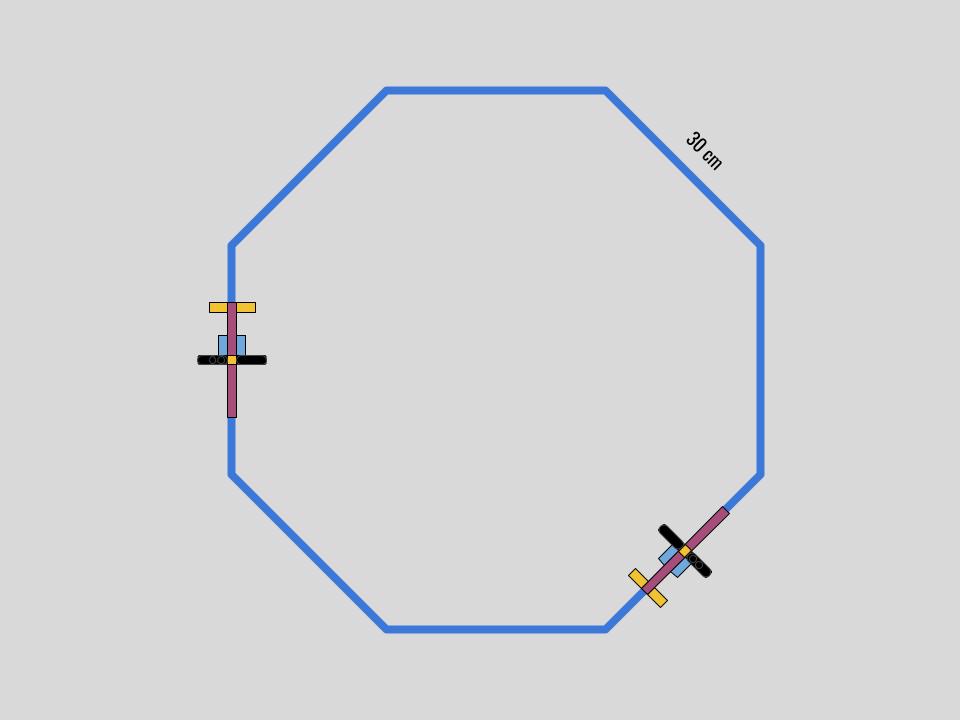
This challenge requires students to apply a basic line-follower program to maneuver around a 30 cm sided octagon layout, with two random stops. To complete this challenge:
The robot follows all eight sides of the 30 cm sided octagon layout and finishes where it starts. The robot may start anywhere on the layout. Note: blue painters tape will be used for the course layout.
Two “distance sensor stanchions” will be placed randomly on the layout by the judge. When the robot comes within 15 cm of a stanchion, the robot will stop. The judge will then remove the stanchion and the student can then restart the robot to continue on its path.
The robot can start at any point on the layout, but must stop within 5 cm of its starting point after following the entire layout.
Note
The robot completes the challenge moving along the layout and may follow the inside or outside of the layout. Participating schools may bring their own layout, if they wish, subject to the judges approval.
Field diagram challenge 6#
Challenge 7: Line Counter#
This challenge requires students to take input from the Color Sensor, store data in variables, and use it to illuminate the light matrix. To complete this challenge, the Driving Base must move around the course in the following manner:
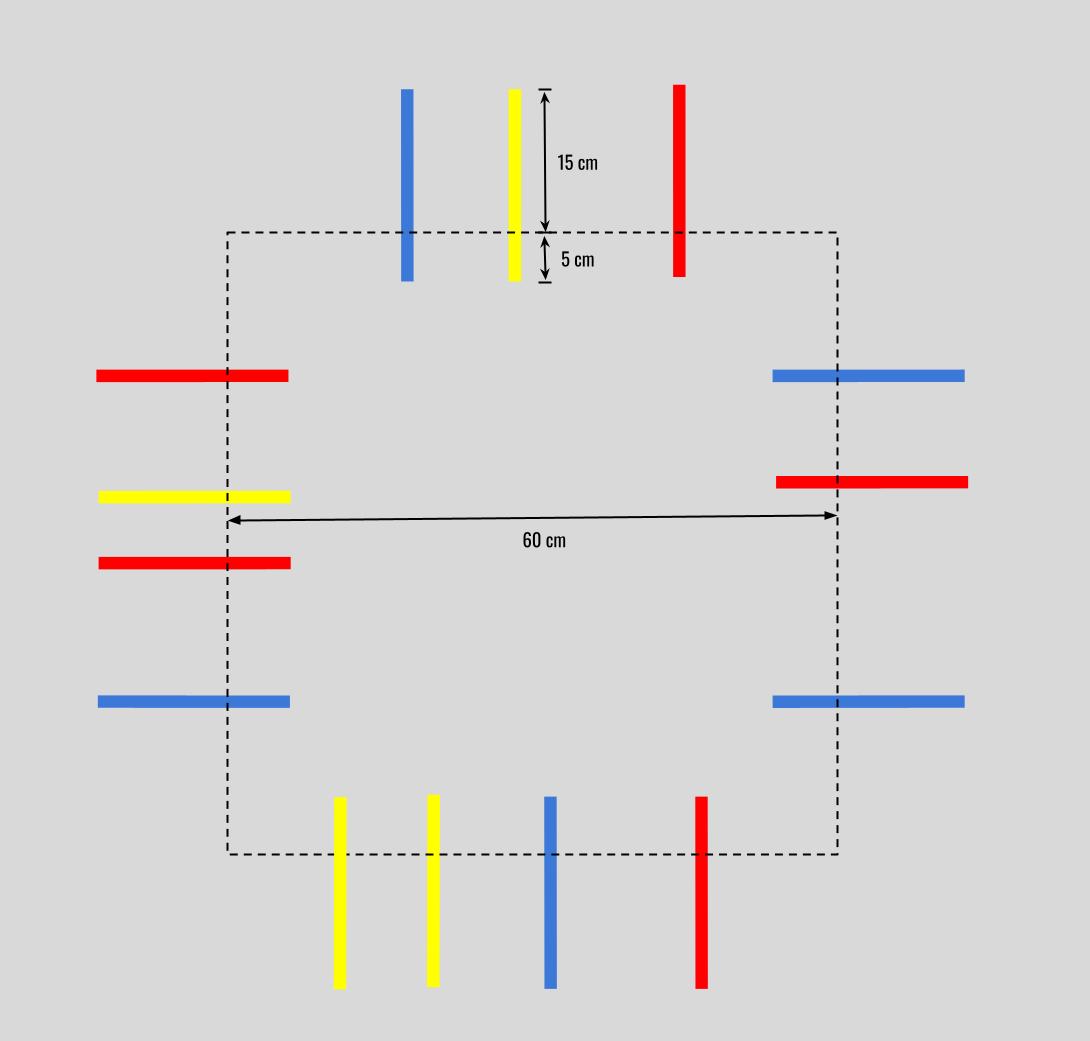
The Driving Base moves along a 60 cm square path without using the Color Sensor.
At varying intervals, a random number of 20 cm long blue, red, and yellow lines (3M vinyl electrical tape) are positioned perpendicular to the Driving Base’s direction of motion. They extend 5 cm inward from the path and 15 cm outward from the path.
There is a minimum of 10 cm between each colored line. When the Color Sensor detects a colored line, the Power Button changes to the line’s color, and the program keeps track of how many red, yellow and blue lines are detected.
The judge waves their hand within 15 cm of the Distance Sensor, and the Driving Base stops.
The Power Button turns red, and the light matrix displays “RED.”
The light matrix displays the number of red lines detected.
The Power Button turns yellow, and the light matrix displays “YELLOW.”
The light matrix displays the number of yellow lines detected.
The Power Button turns blue, and the light matrix displays “BLUE.”
The light matrix displays the number of blue lines detected.
Field diagram challenge 7#
Challenge 8: Maze Runner#
This challenge requires students to utilize a loop to execute commands at randomly arranged “markers” and navigate through a maze to reach the safety of the “glade.” To complete this challenge, the Driving Base must move around the course in the following manner:
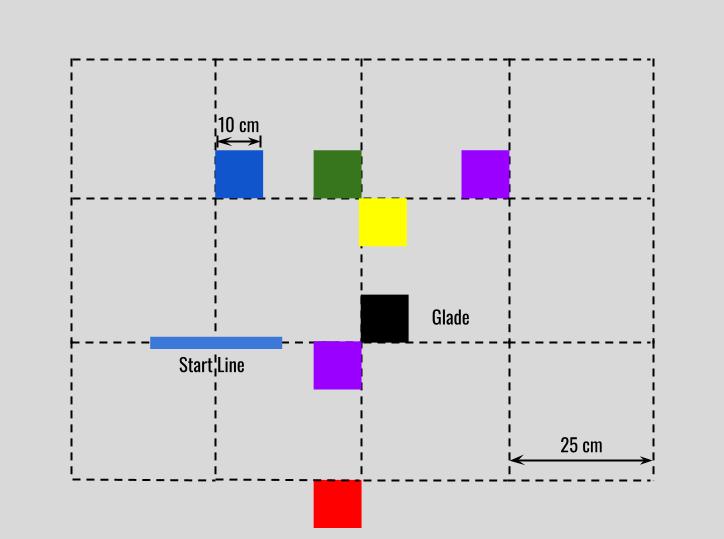
Four to eleven colored markers are arranged on a 25 cm grid on a 4’ by 8’ table and must be detected before reaching the glade and finishing the challenge.
Markers are 10 cm by 10 cm and are colored red, black, Lunar Blue, Gamma Green, Fireball Fuchsia and Solar Yellow. Colored paper used for the markers is available at Office Max. 3M #35 red vinyl electrical tape is utilized for the red markers.
From the start line, the Driving Base proceeds forward 25 cm to the first marker and executes the following commands at each marker:
90-degree right turn in place at blue markers
90-degree left turn in place at green markers
No turn at violet (Fireball Fuchsia) markers
180-degree turn in place and travel 25 cm backward at yellow markers
180-degree turn in place at red markers
Stop at the black marker (glade)
After the Driving Base detects each marker, the Power Button color changes to match the marker. The Driving Base executes the correct turn command and proceeds 25 cm to the next marker.
When the Driving Base reaches the black marker, or glade, it stops, the Power Button color changes to orange, and the light matrix displays “GLADE.”
Note
The judge may randomize the marker arrangement, and thus the maze layout, throughout the Jamboree. Students can adjust their Driving Base slightly as it travels from marker to marker to ensure that the Color Sensor can detect the next marker.
Field diagram challenge#
Challenge 9: Wind Sprints#
This challenge has the Driving Base complete a popular conditioning drill on a basketball court. In addition to employing a repeat loop, creating variables, and using at least two programming stacks, one program version uses variables embedded in an operator. It references a list of the lines where the robot will turn. To complete this challenge, the Driving Base must move around the course in the following manner:
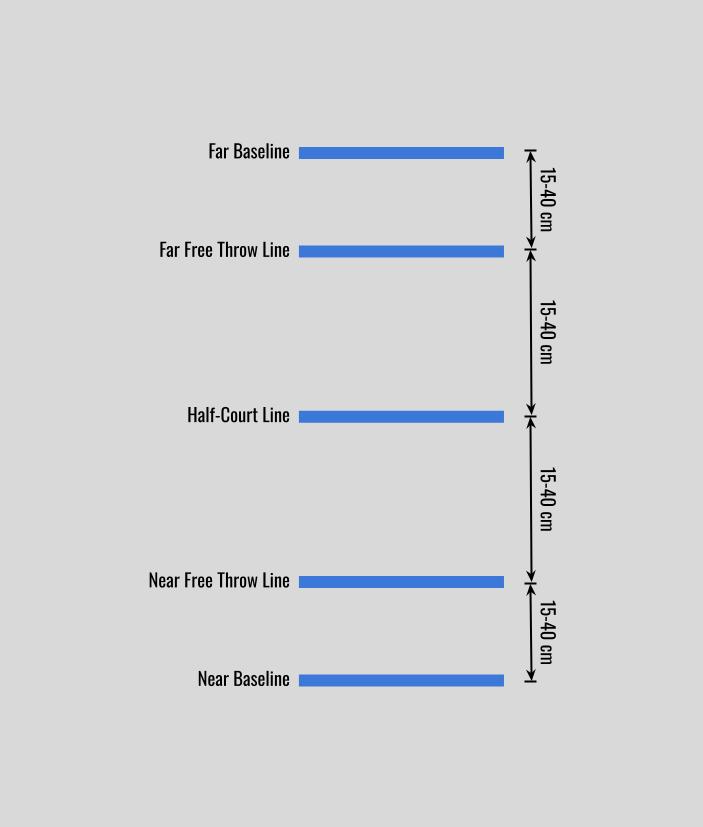
The tires of the Driving Base are placed on the baseline (line 1) on a 4’ by 8’ table surrounded by walls.
The Driving Base moves toward the near free throw line (line 2), taps the court and turns (raises and lowers the arm) when the line is detected, returns to the near baseline (line 1), taps the court and turns.
The Driving Base proceeds to the half-court line (line 3), taps the court and turns when the line is detected, and returns to the near baseline (line 1).
The Driving Base taps the court and turns at the near baseline (line 1) and proceeds to the far baseline (line 5), then to the far free throw line (line 4) and again to the far baseline (line 5), then to the half-court line (line 3), then to the far baseline (line 5) and lastly to the near baseline (line 1), tapping the court and turning at each line.
Lines 1 through 5 will be spaced at uneven intervals ranging from 15 cm to 40 cm.
Each time the Driving Base detects a line, the line count is increased, and this number is shown on the Hub display.
When the Driving Base returns to the near baseline for the final time, it stops and displays “I’m tired and confused!”
Field diagram challenge#
Challenge 10: Search and Rescue#
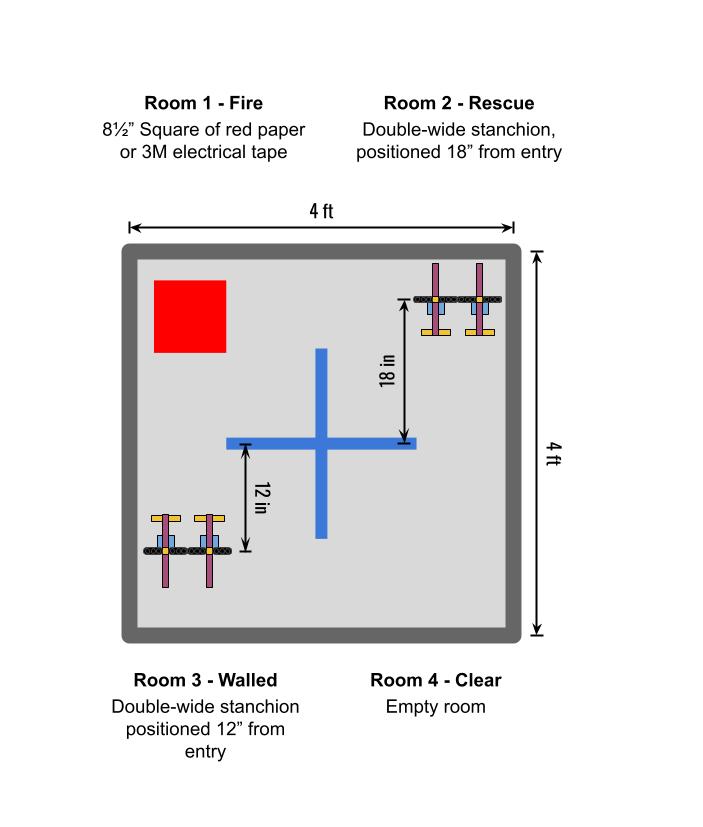
In this challenge, you will program the Driving Base to navigate a 4-room building. The Driving Base must perform 4 unique actions for 4 unique rooms, which will be randomized in order to simulate a hazardous area where conditions are unknown. The Driving Base must complete tasks in all 4 rooms, and return to the starting point. Each room will be equal in size and arranged on a 4’x4’ game board. The exit of each room will serve as the entry point of the next room.
Room objectives:
Fire: The Power Button turns red, the Driving Base runs over the fire and exits the room Rescue: The Driving Base taps the floor near the stanchion (raises and lowers the arm) and exits the room Walled: The Driving Base avoids the wall and exits the room Clear: The Driving Base writes “Analyze” on the light display and exits the room
How to program the challenge
Determine how each of the four rooms can be identified using sensors
Use if-then and/or if-then-else commands to complete the task for each room and arrange these in a sequence that will accurately completeall tasks, regardless of which room is presented first
Fine tune turns and travel distances so that the Driving Base exits each room in a consistent position to navigate the next room
Note
Use one program that will travel all 4 rooms
It might be necessary to nest one or more if-then-else or if-then statements inside another if-then-else statement to complete the challenge
The judge will determine which room will be first
Stanchions will be positioned for counter-clockwise travel of the Driving Base around the game board
Field diagram challenge#